Because Quick Fix Forex™ is not mechanical and there is discretion used – there is room for the system to be improved by YOUR experience with it.
From day one your trading of the system will improve as you come to understand the rules better.
The rest of this guide consists of the rules of Quick Fix Forex™.
For each rule there is an ‘A’ part and a ‘B’ part.
The ‘A’ part of the rule is the one you follow for higher probability trades; but these occur less often.
The ‘B’ part of the rule provides more opportunities; but there is less probability of these trades working out.
So, all you need to know is this:
- When starting out, just follow all the ‘A’ version of the rules.
- Once you start to gain experience and confidence you can then start trading using the ‘B’ rules.
- To repeat myself so we’re clear… Follow only the ‘A’ parts of rules until you have had some experience trading Quick Fix Forex™ – then you can follow the ‘B’ parts as your confidence grows.
- Don’t start trading the ‘B’ rules right away – you will more than likely lose when starting out this way.
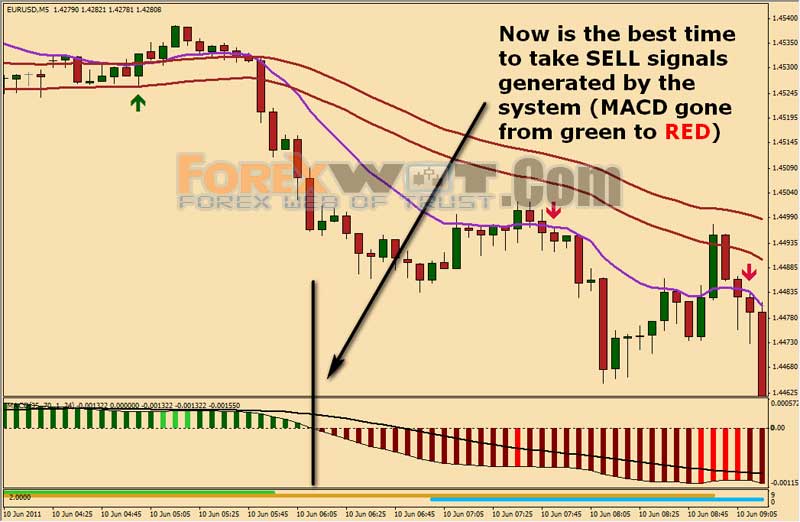
We only BUY when the MACD Bars are GREEN.
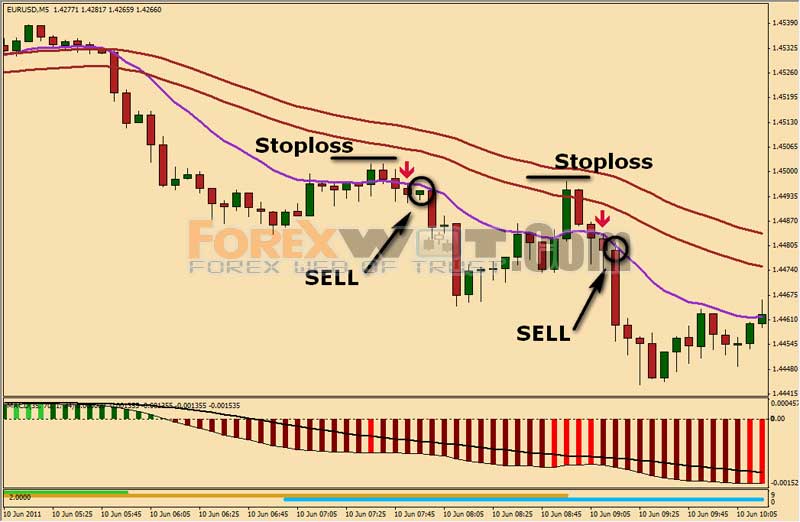
We only SELL when the MACD Bars are RED.
The best time to start looking for a signal is when the MACD has just crossed the ‘0’ line.
In other words…
It’s best to look for a SELL when the MACD Bars have just gone from green to red.
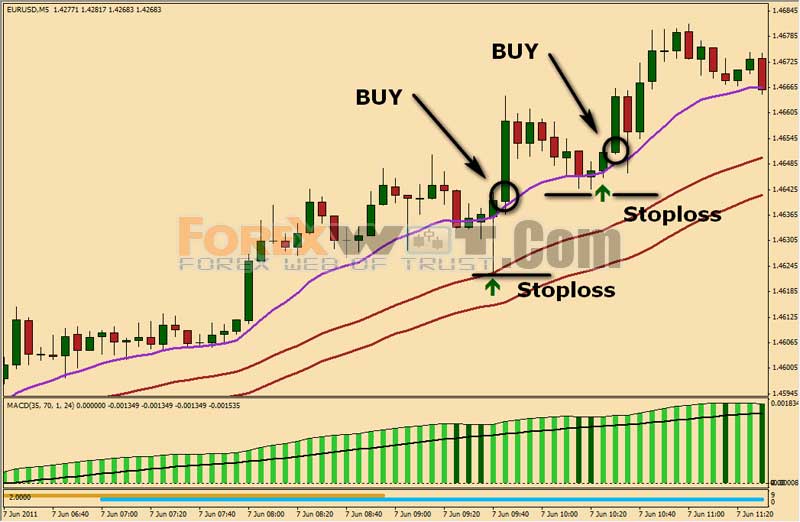
It’s best to look for a BUY when the MACD Bars have just gone from red to green.
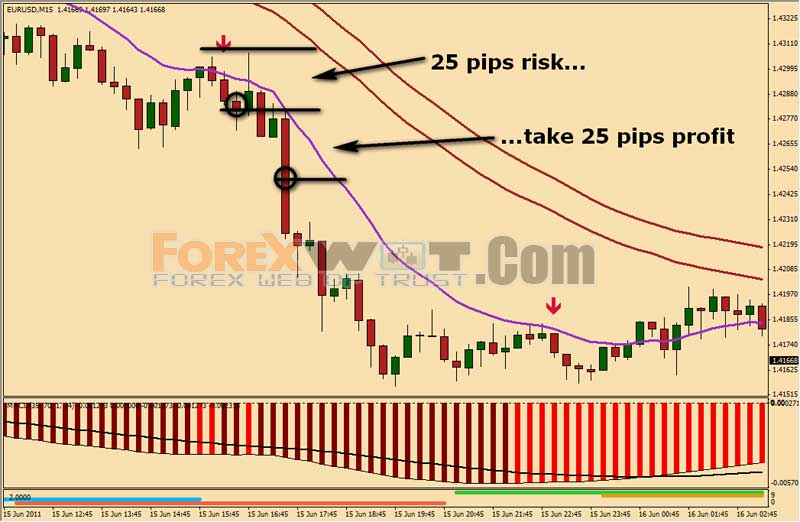
For example (SELL):
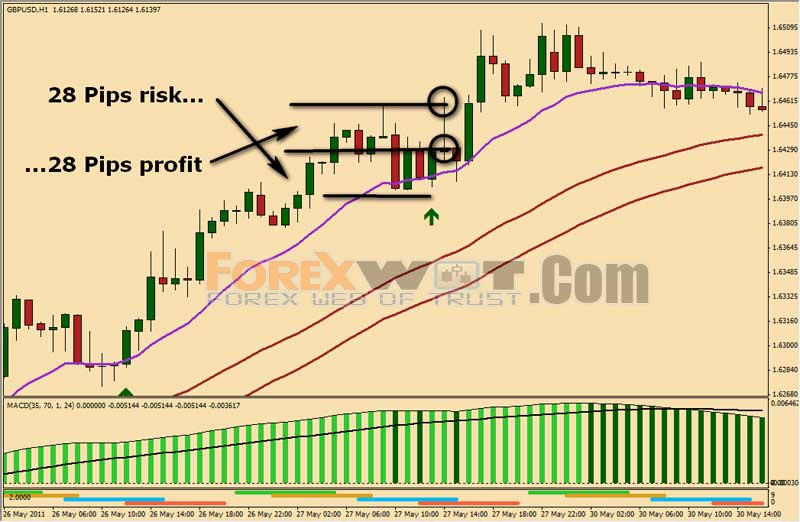
And for a BUY:
Now, remember what I said before, the ‘Part A’ rules are higher probability (but don’t occur so often).
The ‘Part B’ rules happen more often but are not as effective (at least until you get some experience with the system).
So, for this part of the MACD rule, it doesn’t matter if the MACD has just crossed the ‘0’ line; as long as the bars are red for a short (or green for a long) we can be prepared to take a trade.
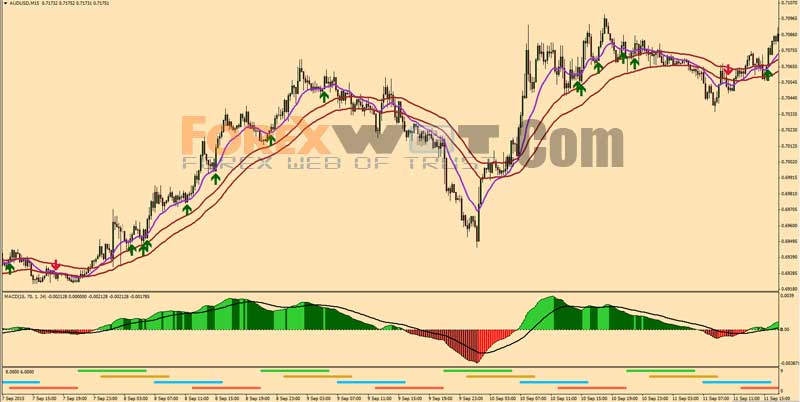
On the charts there is a 50-EMA channel; this channel is made from the 50-EMA of the HIGHS and the 50-EMA of the LOWs.
- We only look to BUY when the 15-EMA is ABOVE the 50-EMA Channel.
- We only look to SELL when the 15-EMA is BELOW the 50-EMA Channel.
Examples:
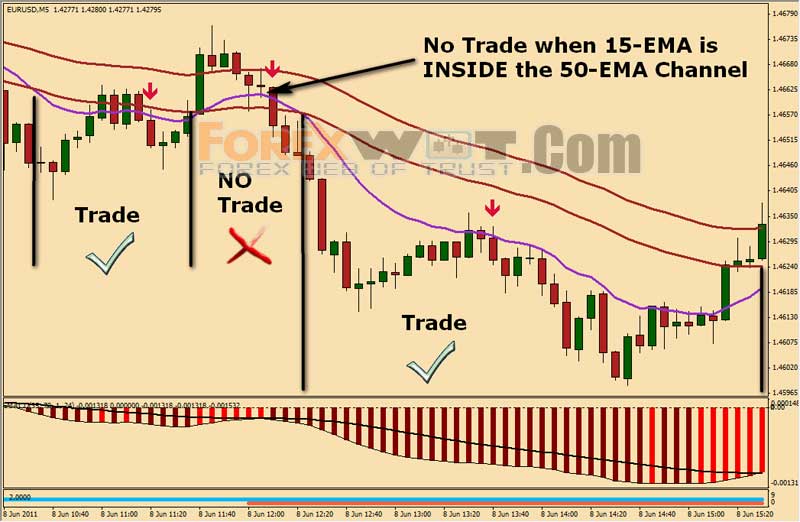

Many times there are good signals when the 15-EMA is just inside the 50-EMA Channel.
Once you have some experience, you will start to recognise when it’s okay to take trades when the 15-EMA is inside the 50-EMA Channel; until then, stick to ‘Part A’.
If you’re trading this system on intraday charts (e.g. 5-min, 15-min, …) then only trade the London and US sessions.
This is especially true if you are trading currencies that do not have JPY, AUD or NZD in them.
On the charts wehave just seen you will have noticed there was an indicator at the bottom. This indicator tells you what session we are currently in (whether it’s London, US, Australian or Asian).
Throughout this manual we will focus on the London and US sessions; these are blue and red respectively on the indicator.
Note: The time settings on the indicator are not automatic and must be set according to your broker time.
As with the other ‘Part B’ rules, once you have gained confidence trading the system, try it – until then, stick to ‘Part A’ so that you have a greater chance of success.
You can trade the lower timeframes at any time. BUT, there are less “momentum moves” (i.e. moves that keep on going) in the sessions out with London and the US, than at other times – so you feel like you get “chopped” around more.
This is the FINAL rule.
There is no Part ‘A’ or ‘B’ to this rule.
Once you have assessed the first three rules… this fourth rule is the one that determines when you enter a trade.
It’s fairly simple: We BUY (or SELL) when get an UP (or DOWN) arrow on the chart.
NOTE: THE CANDLE THAT THE ARROW OCCURS ON MUST BE COMPLETE. DO NOT TAKE A TRADE HALFWAY THROUGH A CANDLE BECAUSE, UNTIL A CANDLE IS COMPLETE, THE ARROW CAN STILL DISAPPEAR.
Where to place your stoploss will be very obvious when you enter a trade.
You basically place it behind the most recent low (or high) made before the arrow occurred.
Here are some entry examples and where to place the stoploss:
That’s pretty much all there is to the Quick Fix Forex™.
Hopefully you should have it understood (or read over it again if you’re still unsure).
I’m not going to leave you without some examples to make sure you totally understand the system.
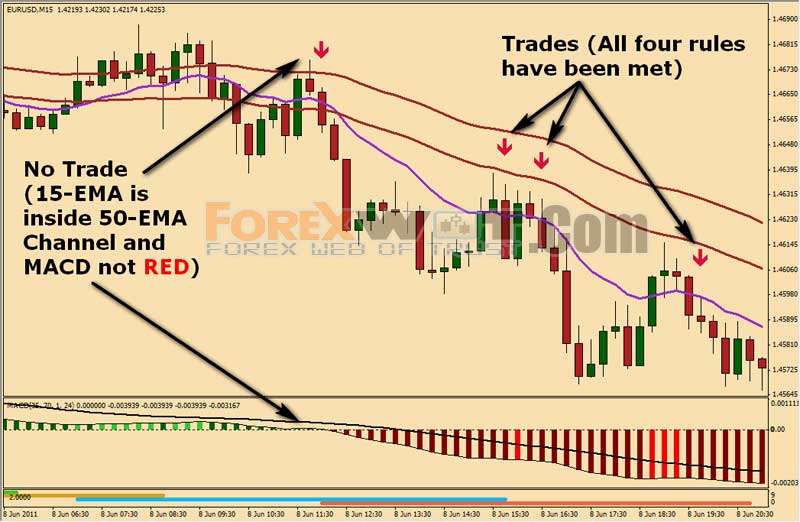
The following trade signals on the EUR/USD 15-minute chart show the first signal is not valid since the MACD is not yet red and the 15-EMA is inside the 50-EMA channel.
The next three trades are valid because…
- The MACD is red
- The 15-EMA is below the 50-EMA channel
- It is within the London/US session times
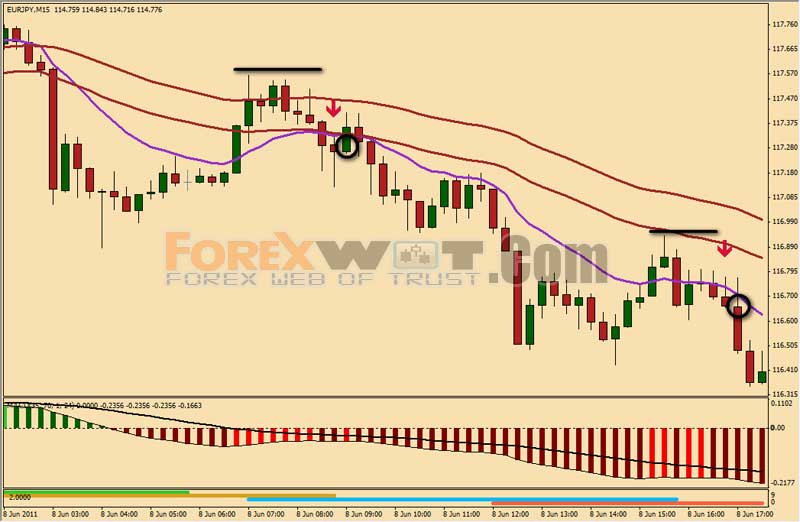
Here are another couple of trade signals on the 15-minute EUR/JPY chart:
Here’s EUR/JPY again – this time on the 30-minute. A little quiz: which of the signals in the following chart are valid for our strict rules (that’s all the ‘Part A’ rules)?…

And here’s the answer…

Are you now starting to see consistency in what we’re waiting for in the trade signals?
The trades I’ve show you so far, also including the next chart, are all from the last couple of weeks.
The following trades are from the USD/CHF and on the 30-minute chart.
All our strict ‘Part A’ rules are met yet again in these trades.
What you should notice about this chart is that the first trade may have hit your stoploss if it was only 1-pip above the standard stoploss level. I recommend having your stoploss at least a few pips above if you’re trading greater than the 5-minute chart.
If you were trading the daily chart for example then it would be prudent to have your stoploss say 10 pips above (or below) your standard stoploss level.

Now, take a look at the following trade signals…

…both very valid signals.
Notice the timeframe? Yep, it’s the daily – you pretty much can’t tell the difference between this chart and an intraday chart. The system works on ANY timeframe.
Can we go to a higher timeframe? You bet we can…
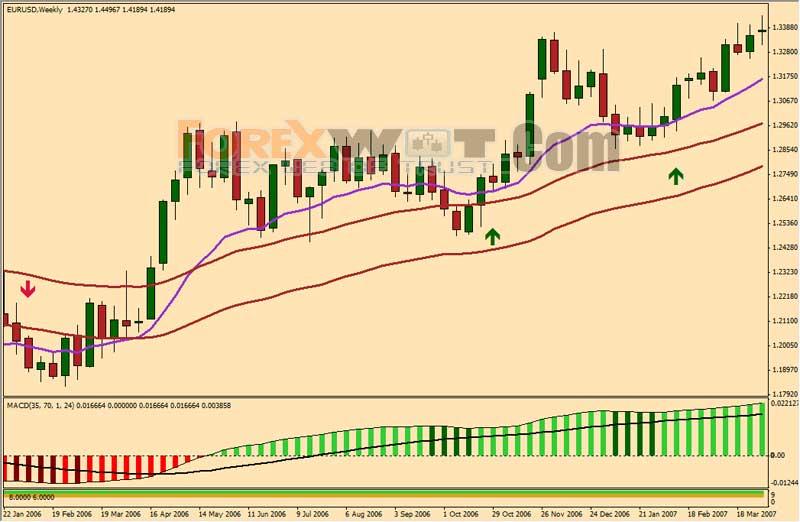
Can we go to a higher timeframe? You bet we can…
That’s the EUR/USD WEEKLY chart.
The first trade on the left (the SELL) was a losing trade… the subsequent two trades on the right of the chart (the BUYS) were decent winners.
Can we go higher still? (I thought you’d never ask!)…
Monthly:
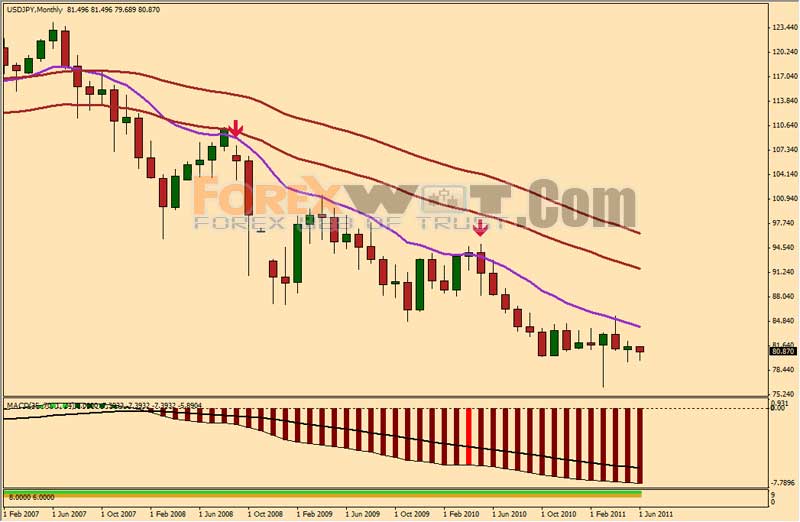
Two trade here on the USD/JPY… one it 2008 and another in 2010!
I’m telling you – ANY timeframe.
Let’s go the other extreme… 1-minute:
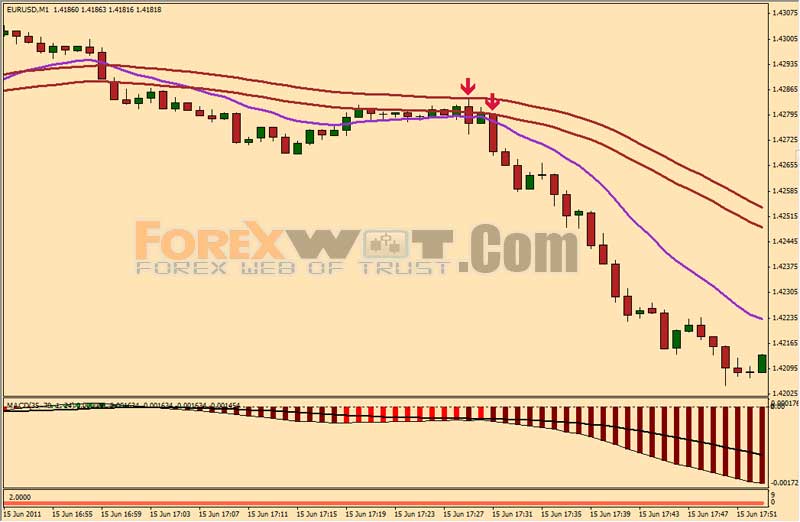
There can be great R:R on the 1-minute timeframe – BUT, you have to be nimble! I do not advise trying to trade the 1-minute until you can trade the higher timeframes.
It’s the 15th June 2011 as I’m writing this… this is the last 12 hours of the EUR/USD on the 15-minute chart:

The second trade above may have been a loser (if it was 2-3 pips or so above then you probably would have been fine – but it’s impossible to tell what your broker will do!).
Never the less, the first trade would have given you a huge R:R, so you have to take the bad with the good.
I have left exits until the end for two reasons.
- The greatest part of this system is that it get you into trades at a very low-risk point. The exit, although somewhat significant, is not actually that significant.
- Do you want to scalp or do you want to get big runs?
Reason #2 above is about what is important to YOU as an individual trader. I prefer to go for larger runs, while others prefer to grab what they can.
There is nothing wrong with either method and one is as effective as the other for the trader applying it.
So, I will now provide three exit strategies, choose the one you feel is right for you… and trade it consistently!
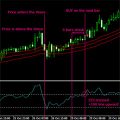
This is simple. Wait until the MACD and the Moving Average line that is on the MACD cross. Like this:

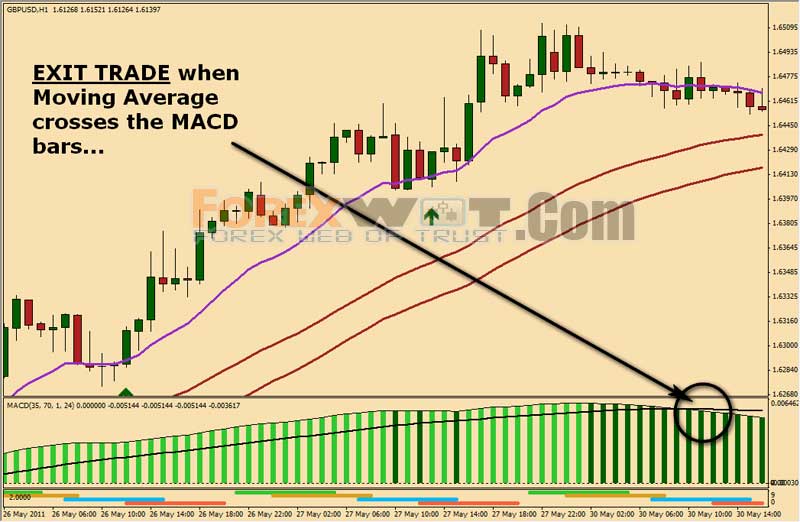
That’s all there is to this exit.
You will have less winners (compared to using the next exit strategy – #2); but your winners will be bigger!
Although I call this the ‘Scalp’ – it’s actually just grabbing 1:1 profit compared to what you risked.
Nothing fancy, but simple and you will get a high percentage of winners compared to Exit #1.
Using the examples from the previous charts:
Okay, I lied to you, there is no official Exit #3 – and this is why…
Stop getting caught-up in the exit!
You know why people focus so much on the exit? Because it’s so emotionally difficult seeing a profit and then letting the market go against your trade and end up taking a loss (or breakeven).
It’s also just as frustrating taking a small profit and then watching the market go ten times as far after you exit for your (relatively) small profit.
Follow either Exit #1 or Exit #2.
Better yet, use Exit #1 for HALF your position, and Exit #2 for the OTHER HALF.
I told you I was only going to write what I needed to about the system in this manual.
Yes, it’s short, but if I wrote any more than this then I’d just be adding things that you don’t need to know.
I have written everything you need to know.
It is now up to you to take this system, make sure you understand it fully, and trade it.
Trade it consistently.
If you try this system for less than a week… you may as well give up Forex trading forever!
I mean it.
What is a week in terms of trading?… it’s nothing. Having a bad week in trading, especially when starting out, is to be expected.
As I write this manual I plan to provide you with a 60 day (that’s 8 weeks!) money-back guarantee. Use it!
 How Do I Become a Good and Prifitable Forex Trader
 Foreign Exchange Currency Trading & Investment Strategy – Forex Z 20 System for Successful and Highly Profitable Forex Trader
 High Accuracy Volty Channel Stop RSI Trading Strategy and How to Win Consistently in Forex Trading
 Simple Powerful and Effective Forex Price Action Trading Strategy Using Moving Average
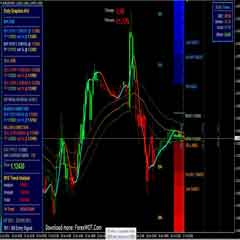 Best Forex & Stocks Trading Strategy with Dolly-Graphics System
 Forex Bill Williams Market Facilitation Index (BW MFI) Multi Trend Trading System and Strategy
 Foreign Exchange Trading : Online Forex Master Level Trading System and Strategy
 High Probability Trading: The 10 Pips Forex Trading Strategy
 Sure Forex Breakout System Absolutely Amazing and Easy Forex Strategy
 Forex Magic Breakout EMA CCI Trading – Maximize Your Profits and Achieve Exponential Earnings
