Once you are used to it and have made a few trades with it, you’ll find that you’re spending very little time actually running with this system.
We trade on the HOURLY CHARTS, so it’s an intraday system, but in reality, you will only need perhaps 1 hour per day dedicated to this. It’s extremely low maintenance.
The other great advantage of this system is the fact that it is self-adaptive and works equally well on any currency pair. It doesn’t matter if you’re trading the GBP/USD or the CHF/JPY….the system works on all of them.
This is a mechanical system, which means you will be getting fixed entry and exit signals which tell you exactly what to do and when.
The Basic Forex Cobra Trading
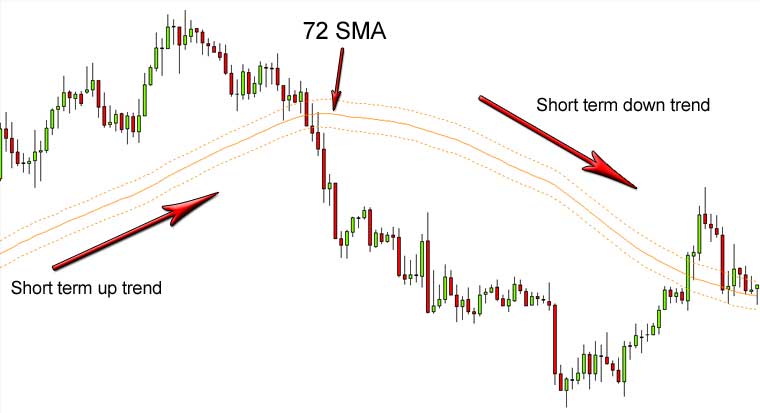
The Forex Cobra System is a short-term trend following system. That means the system takes advantage of short-term small trends within the market.
If you’ve been involved with Forex for more than a few days, I’m sure you’ve heard the sayings: “the trend is your friend” and “trade with the trend”.
There are a million and one trading strategies out there, and most of them can be profitable when traded correctly. However, it is universally accepted that trend following strategies are by far and away the most profitable strategies available.
More money is made….more easily, from trading in the direction of a trend, than from any other method ever invented.
SMA-EMA Cobra Forex System Set Up
This section will very briefly outline the system set up, explain the tools and indicators which form the system and show you how they are plotted on your charts.
Indicators:
This is, in general, a very clean system. When you look at the chart set up, you’ll notice that there are in fact very few lines and indicators drawn on, which means the chart is very uncluttered and easy to read.
There are actually only 3 indicators used in the whole system, even though initially it looks like seven. I’ve listed the individual indicators you need, and then I’ll explain what each one does.

- 72 period SMA (Simple Moving Average) applied to the “typical price” (high+low+close)/3.
- 12 period SMA calculated off the high of each candle.
- 72 period SMA calculated off the low of each candle.
- 12 period EMA (Exponential Moving Average) applied to the “typical price” (high+low+close)/3.
- 12 period EMA calculated off the high of each candle.
- 12 period EMA calculated off the low of each candle.
- 14 period ADX (Average Directional Movement Index) applied to the “typical price”.
Moving Average
The 72 period SMA is a basic moving average line which calculates and plots the average price over the last 72 candles. So for our system, it’s taking the average from the previous 72 hours (3 days).
The 12 period EMA is another moving average, but this time it’s calculating the average over the past 12 hours or half a day. And this MA is exponential which simply means it gives a little more weight or importance to the most recent candles over the oldest ones.
Average Directional Movement Index
The ADX is the Average Directional Movement Index, and it really complements the MA lines. This indicator in its most basic form measures the average direction up and the average direction down over a set period (in our case 14 candles or 14 hours) and then smoothes the calculation out by adding a Moving Average line between the two.
The indicator is used to tell us the strength of a trend. It doesn’t tell us the direction of a trend.
Entry Signal
Ok so now we need to decide upon our reasons to enter the market in whichever direction the trend is telling us to go…….and this is where the 12 EMA enters the system. (To keep it simple I will call the 12 EMA the blue line from now on).
You’ll notice on both the orange and the blue, I’ve used 3 lines. A solid inner line, with two dotted outer lines on either side.
The inner line is the true Moving Average which represents the average typical price over the last 72 or 12 hours respectively.
But a single line like that is too thin to be used in any way as an aid to entering the market on a trade. A thin line would result in too many false signals and losing trades, and that’s why I’ve added the two outer lines to act as a buffer, or safe zone.
If the price is ever inside the buffer zone of either Moving Average, it’s classed as a “no trade zone”, and we DO NOT enter the market for any reason.

But…..
As soon as the price moves outside of the buffer zone, we are looking for entry signals.
And the basic entry criteria are very simple.
First of all, we need to see whether we are above or below the orange line so that we know which direction we are supposed to be trading in. For this example, we are saying that price has moved above the orange line.
Once we know which direction we are trading, we look for the moment that price moves outside of the blue buffer zone on the side of our trade direction.
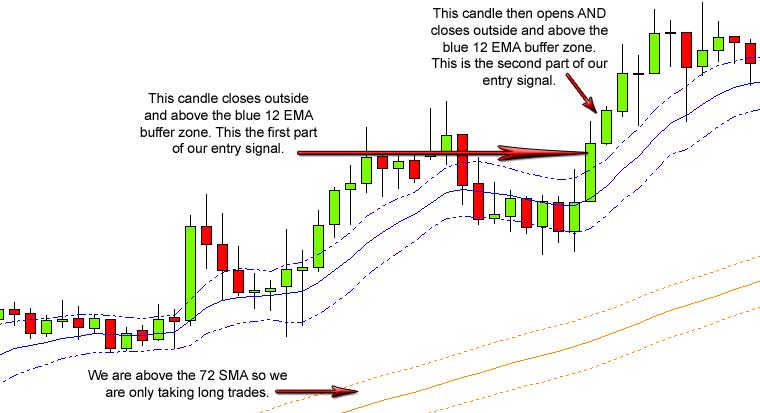
The signal comes in two stages. The first part is when a candle closes outside of the blue buffer zone in the trend direction. So if we are above the orange line, we wait for the price to close outside and above of the blue buffer zone.
We then wait for confirmation in the form of another candle opening AND closing outside and above the blue buffer zone.

You should notice that the price has moved ABOVE the ORANGE XONE which means we are now only going to take long trades. We then get a candle which breaks out of the blue buffer zone and closes above the outside edge of the blue zone.
We then wait to see a second candle which opens AND closes above the blue zone (so effectively the second candle is completely separate from the blue buffer zone), and that’s our basic signal to enter the trade and ride the new trend up.
I’ll give you another example here to show you again to give you more clarification:
You’ll notice that the basic entry signal is always made up of two candles.
The first candle has to at least close outside of the blue buffer zone. The second candle has to have the open AND close of the candle outside of the blue buffer zone, and it has to be the same color as the first candle.
So if you are looking at a long trade (buying), both candles should be up candles and vice versa if you are looking at going short (selling), both candles should be down.
If you do not get the two candles confirming each other in that way, then there is no entry signal whatsoever.
I realize that all this talk of “blue zones” and “orange zones”, and candles opening and closing may sound utterly confusing as you read this for the first time, but I can promise you this is very simple, and you’ll understand it once you’ve seen all the examples I give you in later sections.
The basic idea is we are waiting for the price to break out of the blue zone before we enter the market with a trade.
Trade Entry Criteria
- The first candle must close outside of both buffer zones.
- The second candle must open AND close outside of the blue zone, and must create a new high or low in the direction of the trend.
- The second candle must NOT be a reversal candle.
- The ADX must be above 22 and moving upwards.
- No trade entries on Friday.
The first candle must close outside of both buffer zones
I’ve already explained the basic entry signal, and it’s quite straightforward. But there are occasions when the price may be outside of the blue zone, but is still inside the orange zone.
If this happens, it does not count as the start of the entry signal.

Never forget that the most important, and first rule, is that price has to be above or below the orange zone before we even consider anything else.
If the price is within the orange zone, we effectively do not know which way we should be trading, so nothing else even matters.
So as in the above example, just because the price has broken out of the blue zone, it doesn’t count, because it hasn’t yet moved out of the orange zone. The first thing to check is where the price is in relation to the orange zone.
The second candle must open AND close outside of the blue zone
These are two very important rules to remember.
So first of all the second candle needs to close completely outside of the blue zone:
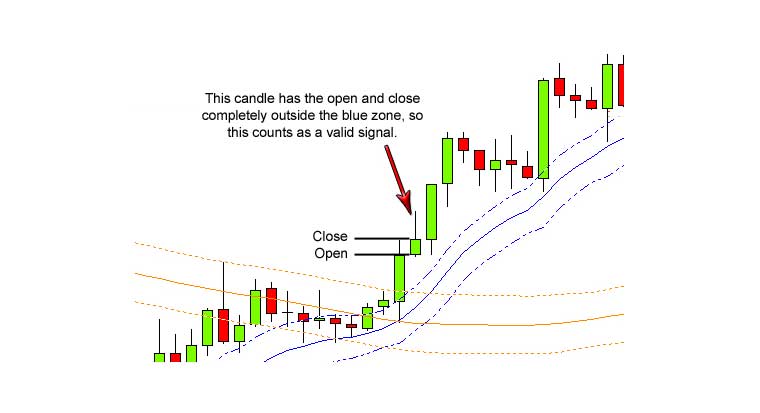

So you can see from the two examples above how the second candle needs to be going in the same direction as the first candle.
The second candle is basically a confirmation of the first candle.
If however, the second candle opens and closes completely outside of the blue zone, but is NOT the same color candle, it does not count.
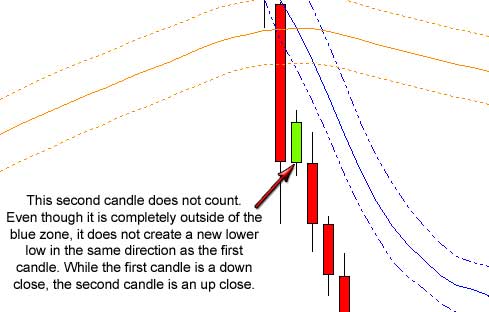
You can see that in the above example, the entry criteria appear to have been met in as much as the first candle has closed below the orange and blue zones, and the second candle has is completely outside of both zones.
But…..
The second candle is suddenly going back in the opposite direction. It is not confirming the movement direction of the first candle, and so the new downtrend is not as likely to continue.
The second candle going in the opposite direction is an early warning that this trade may be a false signal.
The reason we have this filter in place is to act as confirmation. We wait for the second candle to form correctly outside of the blue zone, and in the same direction (color) as the first candle because this confirms that the new trend is likely to continue in the same direction. It’s increasing the likelihood that the trade is a good one.
If we didn’t use this filter, we would end up entering a lot of bad trades based on bad signals.
Of course, just because the second candle does not meet our entry criteria, it doesn’t mean the trade is canceled or forgotten. It just means the first candle signal hasn’t been confirmed yet.
So we just wait for confirmation:
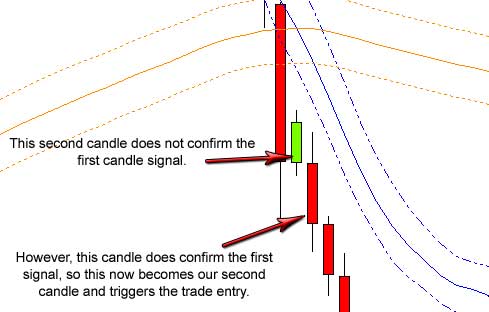
You can see how this process acts like a filter.
When the green “up” candle appeared, we didn’t act, and we were potentially saved from entering a bad trade which could possibly turn against us.
However, when the next candle appeared and closed as a “down” candle with a new lower low compared to the first candle, this acted as confirmation that the new trend was indeed heading downwards and we had a signal to sell the currency.
So all you’ve got to remember here is that the when the first candle breaks out and closes outside of the buffer zones, we have an early warning of a possible trade.
We then wait for confirmation in the form of another candle forming completely outside of the buffer zones, and in the same direction (color) as the first candle.
It’s as simple as that! And again, you will see lots of examples in later sections, so this will quickly become very obvious and easy for you.
The second candle must NOT be a reversal candle
The reversal patterns I specifically mean are the following:
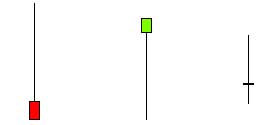
Basically, reversal candles are where the open and close of the candle are very close together which causes the colored body of the candle to either not exist or be very small……and the tail/wick (the long line) is very long in comparison to the colored body.
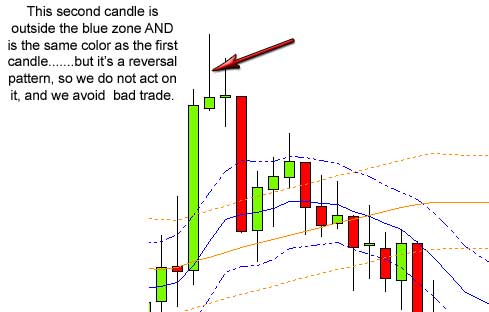
This simple filter will keep you out of a lot of false signals.
The ADX must be above 22 and moving upwards
Earlier in the manual, I explained that we use the ADX indicator, and I gave you a brief explanation of what it was and how it worked.
Now I want to show you the important part……… how we use the ADX to help filter good trades from bad trades.
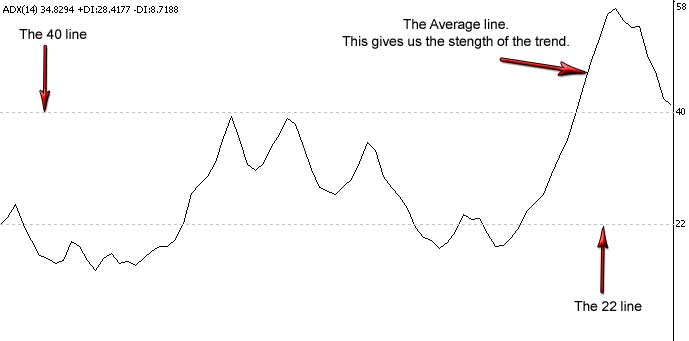
- When the average line is below the 22 dotted line, it means there is no trend.
- When the average line is above the 40 dotted line, it means there is an extreme trend.
- When the average line is moving upwards, the trend is gaining strength.
- When the average line is moving downwards, the trend is losing strength.
Whenever we see the two candles that form the entry signal, we immediately look down at the ADX to see where the average line is.
If the average line is below the 22 dotted line, we do not trade, regardless of anything else. We only consider entering a trade if the average line is above the 22 dotted line.
The 22 line is our marker. Anything below the 22 line is a no trade zone. Anything above the 22 line is a possible trade.
We also need to look at which direction the ADX average line is heading. If it is moving down, we do not trade because the current trend is losing strength.
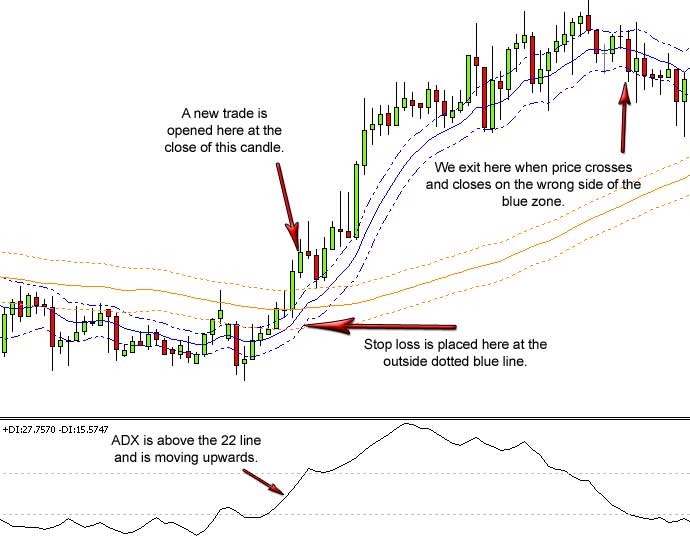
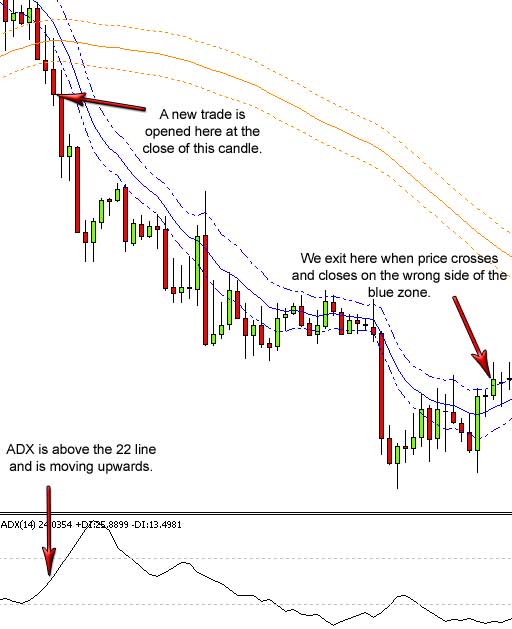
If the ADX average line is ABOVE the 22 dotted line and is moving in an upwards direction, we have everything aligned as far as ADX is concerned to signal a valid entry to the market.
The illustration below will show you examples of valid trades and non-valid trades according to the ADX filter.

As you can see, the ADX is a very simple indicator and very easy to use as a filter to protect the system from bad trade entries.
The indicator will sit underneath your chart and move in exact sequence with the price on your chart. When the second candle forms to give us our potential trade entry, you simply need to glance down at the ADX and see where the average line is sitting and which direction it’s pointing.
If anything in the ADX does not match the criteria I’ve just explained above, we do not have a valid entry signal.
Exit Strategy
The exit is simply signaled when the price crosses and closes on the other side of the blue zone.
So suppose you are in a short trade following the trend down. You would close out of the trade when the price crosses back up through the upper dotted blue line:
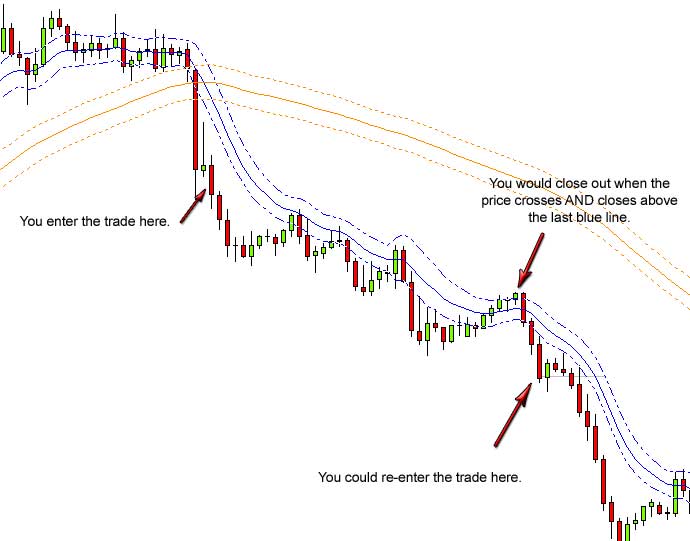
In the example above you can see that we stay with the trade and ride it down until it appears the trend is turning against us and about to move back up. The price has crossed back over the blue zone and looks like it is about to continue up.
Normally this gets us out of the trade at the most profitable time. It allows us to stay in the trade without panicking and closing out too early, but at the same time closes us out early enough so that we don’t give back too much profit when the market genuinely is changing direction. The upper blue line of the blue zone is effectively acting like a dynamic trailing stop loss.
In this example, you can see the price does actually continue down after we have closed out….and that’s not a problem. You can see immediately after closing out, we get another perfect entry signal, and could have re-opened a trade in the same direction and followed it on down for even more profits.
Here’s another example, but this time on a trade following the trend upwards:
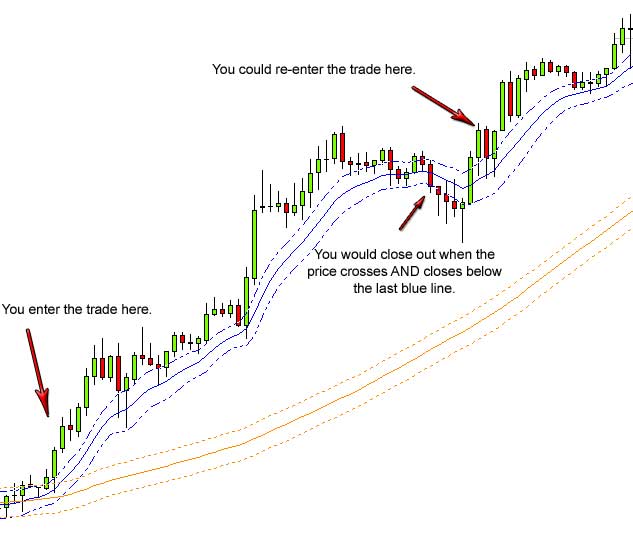
You can probably see that there are actually lots of potential places where you may have been tempted to manually close the trade if you were looking at this without a plan and were
This exit strategy is designed to keep us in profitable trades as long as possible to ride the trend as far as we safely can, but still get us out of the trade as quickly as possible when things are seriously looking like turning against us.
Again, just like the entry signals, we are relying on the actual price to give us the signal rather than the lagging indicators. And by using this strategy we are able to react much more quickly to changes in the trend, and therefore maximize our profits.
It’s an extremely simple system, but extremely powerful.
Hopefully, you’re starting to see that the best systems do not need to be complicated or fancy to be able to make a lot of money.
Trailling Stop
The problem for most people lies in deciding where to put a stop loss, and unfortunately, most people put them much too close to their entry point.
Where ever I enter a trade, I draw a straight line back to the blue zone and place my stop at the outside dotted blue line:
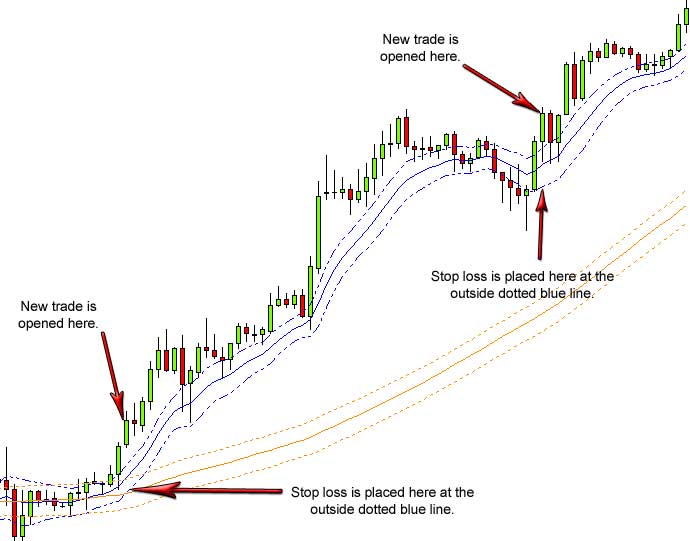
So you’ve always got a very obvious visual position on your chart as to where to place your stop loss when you enter a new trade. You don’t have to go looking for complicated pivot points, support & resistance or anything else.
Of course using this method means that the actual pip distance the stop is from the entpoint will vary on every trade.
Sometimes it’s a 30 pip stop loss, and other times it’s 80 pips. Remember this makes no difference to the amount of money you’re risking…. as I will explain in the next section about money management.
The reason we use this method for determining the stop position is because it is always proportional to the trend and will most often give just the right amount of breathing space for the market to move about comfortably.
When the market is volatile and the trend is strong, the stop loss will increase accordingly to accommodate the conditions.
When the market is slower with less movement, the stop loss tightens up accordingly to adapt to the different conditions.
It’s an adaptive stop strategy, just like the rest of the system, which changes as and when the market conditions change.
This is 100% more effective and accurate than using fixed stop-loss positions like most other strategies employed.
Now, when the trade is open, we don’t want to simply leave the stop loss at the same position for the whole time. Our main aim is to “not lose money”, so we want to reduce the risk as soon as we can.
And for that, we use a trailing stop loss!
This means we move the stop loss as the real price move away from our entry point.
So assume we’ve entered a trade with a 50 pip stop loss, and the price is going in our favor and we are in profit. In this case, we move the stop loss up a little closer to where we entered.
We are moving it up to a point where we are at break even!
So, if the price moves 10 pips in profit, we move the stop loss up 10 pips. So the stop still 50 pips behind where real price is, but it’s now only 40 pips from where we first entered.
If the price moves up another 10 pips to 20 pips in profit, we move the stop up another 10 pips. So again it is still a full 50 pips behind the current price, but we are now only 30 pips away from the point we entered at.
We carry this on until the stop loss is at the same level as where we first entered the market.
We’ve “trailed” the stop loss an equal distance behind the real price, but all the time it’s been getting closer and closer to our entry point.
So if we entered the market with a 100 pip stop loss, we would trail it up at a constant 100 pips behind the real price until we reached the break even point.
So for example if the price moved to 100 pips in our favor (we are 100 pips in profit), the stop loss has moved up to the exact level at which we entered the market, (so 100 pips behind where the new price currently is).
We constantly move the stop loss up in increments of 10 pips, all the way up until we reach the break-even point.
What this does is reduce our risk as price moves us in profit.
Initially, as we enter the trade, we are potentially going to lose 50 pips (if that’s what our stop loss is set to). But if the price moved 20 pips into profit, we would move the stop loss up by 20 pips, so it is now only 30 pips away from where we first entered.
Now if the market suddenly reversed on us and came back in the opposite direction, instead of losing 50 pips, we only lose 30. We’ve reduced our risk!
This strategy limits our risk and losses as quickly as possible.
Now, once we have reached a break even point (our stop loss is at the same level as where we first entered the trade), we leave it there and stop trailing.
Do NOT carry on trailing the stop loss from the break-even point!
From this point on, we are using the blue zone to trigger our exit from the trade, just as I explained in the previous section.
Remember we are using a trend following system, so we want to ride the trends for as much profit as possible, which means letting the market fluctuate. So as soon as you reach break even, leave the stop loss alone and wait for the price to move back past the blue dotted line to signal the exit.
The reason we trail the stop initially is to reduce our potential losses. The most important thing is to “not lose”. Once we’ve achieved that by getting the stop loss up to break even, there is nothing to worry about…..we can’t lose anything.
And so from this point, we can just leave the market to move about, breath and fluctuate as much as it wants as it follows the trend, and we only finally exit when the price crosses over the blue zone.
Again, just like the rest of the Cobra System, the stop loss is a very simple and straightforward mechanism.
Trade Examples

SMA-EMA Cobra Forex Bitcoin Trading System. This is an extremely low risk, high reward strategy which can and will change your life if you use it properly.
[sociallocker]
[/sociallocker]

